
The inevitable switch from Google AdWords to the new Google Ads is here; since October 18th 2018 the new Google Ads experience has fully replaced Google AdWords. This is the third in a series of three posts on the new Google Ads with a focus on utilizing Google’s dynamic ad features. The other posts focus on 4 tips and tricks in Google Ads and outlining campaign creation, reporting and optimization in Google Ads. If you’re unfamiliar with Google Ads we recommend you read both of those posts, which will get you up to speed in no time.
The new Google Ads experience is all about automation. From reporting to recommendations, Google has put a lot of work into doing the heavy lifting for advertisers, allowing us to get more strategic with our media buying. So it’s no surprise that Google has taken this automation further with the ability to dynamically create ads, on-the-fly, that are tailored to a Google user’s specific search.
While these features may not be unique to the new Google Ads experience – a Google search for ‘dynamic search ads’ yields results dating back to 2014 – these features are much more prominent in the new Google Ads interface. Therefore, now’s the time to learn about what they are and how you can leverage them in your own Google Ads accounts.
Dynamic Search Ads in the new Google Ads
In a nutshell, Dynamic Search Ads allow advertisers, especially those with larger websites and sets of products/services, an easier and more scalable approach for creating ads, while maximizing relevancy for the end user. Advertisers provide their URL or list of landing pages, along with a bit of descriptive text for ad creative (sans headline) and Google does the rest dynamically based on the user’s specific search query.
An example that Google provides is a large hotel in a big city. Rather than creating a campaign and ad groups in the traditional way, with numerous keywords and multiple ad sets for split-testing, the advertiser would instead provide the URL for their hotel (or one or more preferential landing pages) and a bit of ad copy. When the user’s search query matches with the dynamic ad, Google then cobbles together a headline and pairs it with a landing page that it deems to be most relevant to the search term. Not only cool stuff but also extremely useful for us: this ultimately frees the advertiser up for getting more strategic with their media buying rather than spending time on setup, leverages Google’s own AI to create relevant ads for us, and allows us to leave work early for the ever-popular Friday After-Work Beers.
How to Enable Dynamic Search Ads in the new Google Ads
Here’s a breakdown of how to enable Dynamic Search Ads for a new campaign:
- Create a new campaign and select the Search network
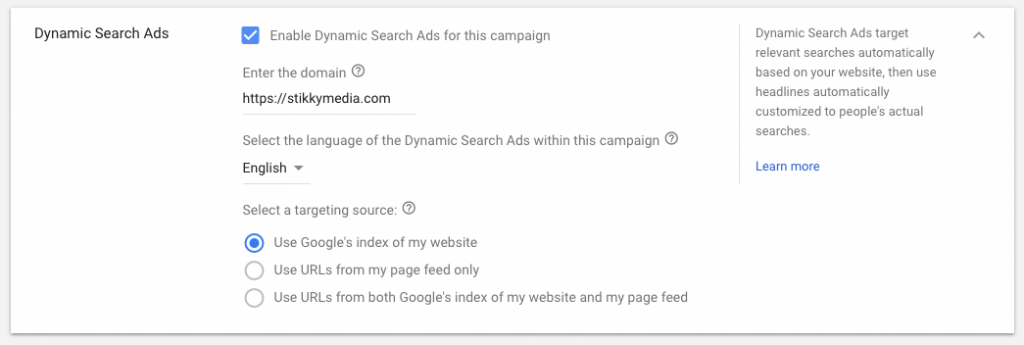
- One of the first things you see in the Settings menu is titled Dynamic Search Ads. Click into it to expand it and check the box up near the top to enable Dynamic Search Ads
- Plug in the domain of your site. Alternatively you can create a Page Feed in the Shared Library to provide Google Ads with the URLs you want it to select for your landing page. For simplicity we recommend providing your URL, but if you want to create your own page feed you can download the CSV file to do so here.
That’s it! You’ve now enabled Dynamic Search Ads in your campaign. But you’re not done yet; we’ve still got a bit more to do before Google starts dynamically working its magic.
How to Set Up Dynamic Ad Groups – no keywords required!
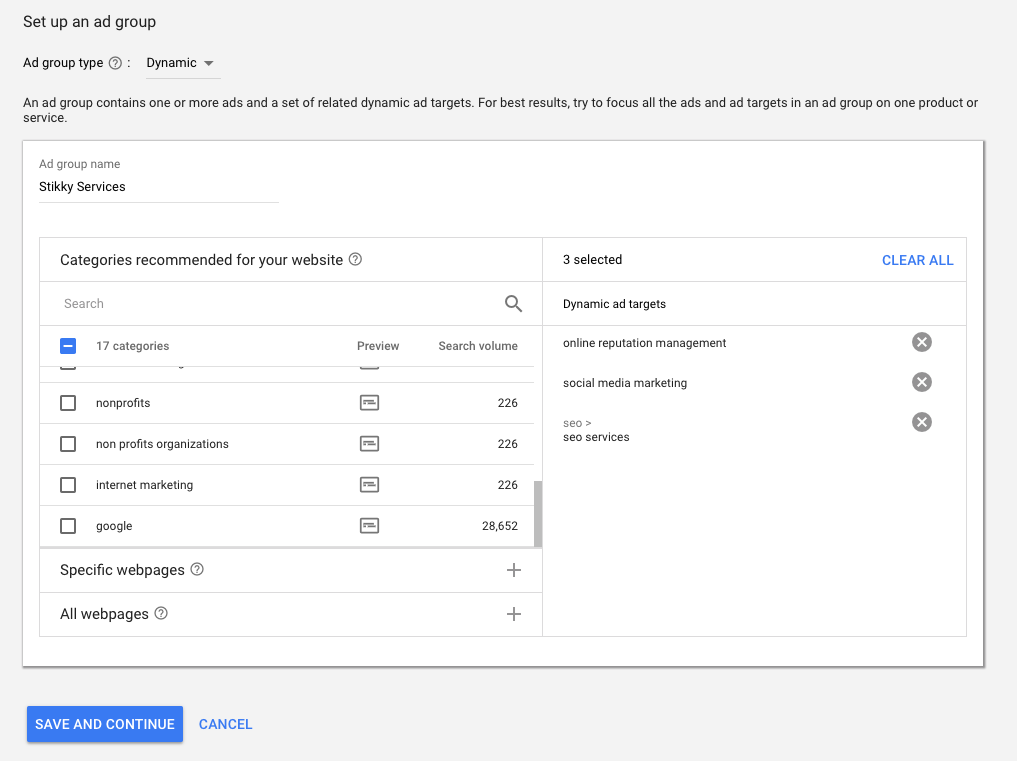
After opting into Dynamic Search Ads, you’ll be taken to the ad group creation screen. From here you can either create your dynamic ad group for your ads, or you can bypass this and create the ad group later once the campaign creation process is done. Either way, you’ll need to create a dynamic ad group at some point if you want to run these ads. But don’t worry: creating a dynamic ad group is about as easy as enabling Dynamic Search Ads.
When creating your new ad group for your campaign, select Dynamic for the ad group type from the drop down menu (if Dynamic doesn’t appear you still need to enable Dynamic Search Ads in the campaign settings). What follows will be a list of ad group targeting types that you’ll be choosing from. It’s important to note that this targeting is based on the specific pages you want Google to be creating your ads around and sending traffic to.
There’s three types of targeting to choose from:
- Categories recommended for your website – Google Ads will essentially group your site into different categories based on its content, and you can choose which of those categories you want to target with your ads. For our site we will choose categories based around our service offerings – SEO, PPC, Social media etc.
- Specific Web Pages: You’ll provide Google Ads up to 20 URLs to target, or create rules for targeting for your web pages
- All web pages: For advertisers who want to target every product and service offering on their website, across every web page
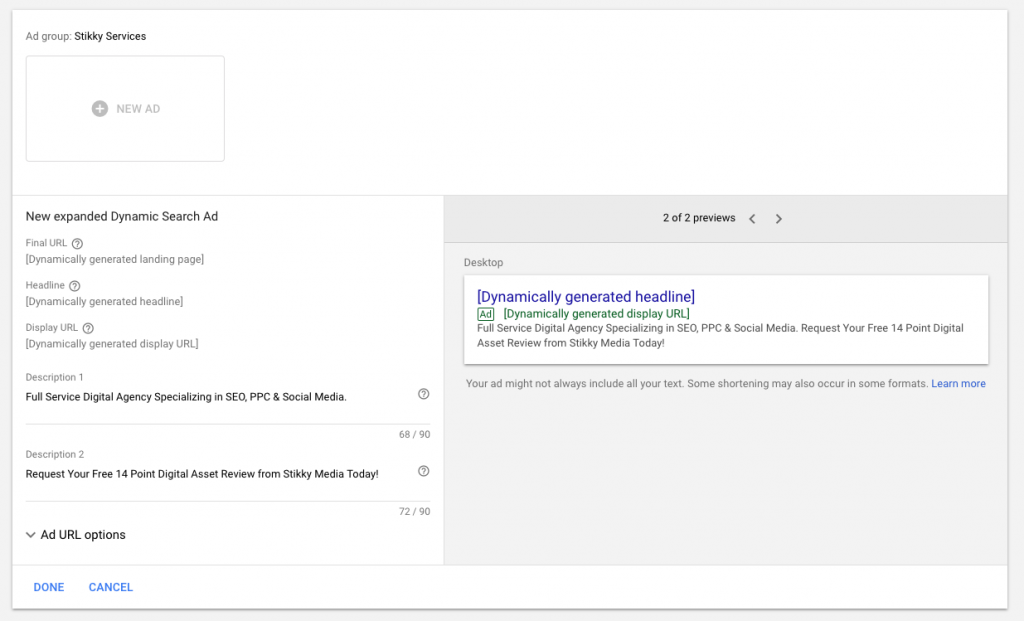
Once you’ve saved the website targeting you’ll then create your ads. This is one of the coolest features of Dynamic Search Ads. Up until now, writing and testing ad creative has been one of the most onerous tasks in Google Ads. However with Dynamic Search Ads Google actually writes the headline, the path for your URL (i.e. everything that comes after the first slash) and picks your ad’s destination URL (based on the targeting you selected above), thus doing all the heavy lifting for you.
Google is pulling all of this information from your website’s content and the specific search query that the user typed in and it’s all done near real time, so that the end user has no different experience than if they were served a traditional search ad. Have we mentioned that we think this is pretty cool? All you need to provide Google Ads is a couple 90 character descriptions. After creating you can preview it, create a few more and save them to your account and that’s it, you’ve created a dynamic ad group for your Dynamic Search Ad campaign – no keywords required!
Understanding Dynamic Ad Reporting in Google Ads
Reporting for your dynamic ad groups in Google Ads is pretty straightforward. Much like how clicking into a standard search ad group would display numerous keywords for your reporting, you will instead now click Dynamic Ad Targets to see the targets you’ve selected for your ads. For our example we would see the specific Stikky Media service offerings that we’ve selected to promote, such as social media marketing. On the reporting screen you’ll see all the familiar metrics, including clicks, conversions and cost, and you can of course change the columns that you want displayed.
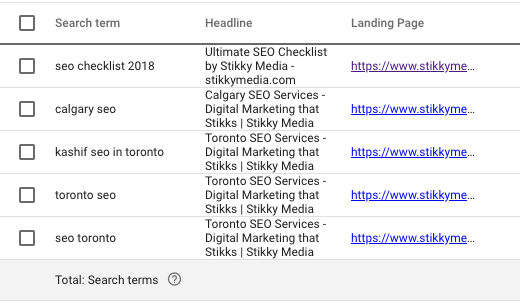
Much like keywords, if you find any of these targets not performing well for you there’s an option to add them as category negatives from the reporting screen. Simply click the Negative Dynamic Ad Targets menu item near the top of the screen, click the plus sign and plug in your negatives. Also much like the keyword report you can see the actual search terms that triggered your dynamic ads. Click the Search Terms menu item next to the Negatives and view which terms have triggered your ads, along with associated metrics. We’re seeing a CTR of 2.94% for one of our dynamic ad groups, compared to an overall search ad CTR of 1.30%. Not bad!
We’ve covered Dynamic Search Ads, dynamic ad groups and how reporting works for these features. Now it’s time for you to log into your Google Ads account and start experimenting with these cool features and seeing how well they do against your standard search ads. If you’re like us you might be surprised to see a substantial lift in performance!
Want to Take your Pay Per Click Campaign to the Next Level?
While a DIY mindset is a great way to approach pay per click campaigns, with the digital media industry changing constantly, augmenting your team with knowledgeable experts can makes it easier to outpace your competition. There are a lot of subtle nuances that can make a big difference.
If you need help optimizing your next pay per click campaign request a free PPC audit today.

